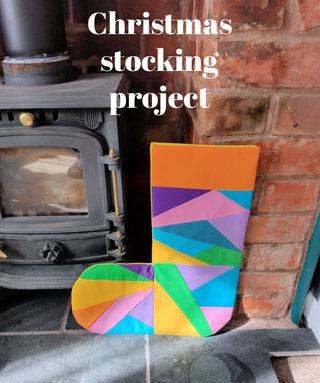
This scrap friendly foundation pieced Christmas stocking project can be made with Christmas fabrics or looks great in rainbow colours like we've chosen to do. The finished stocking is 18 inches tall and 15 inches wide. There's also a panel on the top where you can add a name to personalise the stocking.

Materials:
An assortment of scraps for paper piecing
A fat quarter of fabric for the back of the stocking
1/2m of fabric for the lining
Fusible fleece or interfacing (optional)
8 inches of ribbon to make a hanging loop (optional)
Add a quarter ruler (optional but very handy)
Sewing clips (optional but handy)
Seam allowance 1/4 an inch
Foundation templates (designed with EQ8): one, two, three

Download the 3 block templates (above in materials list) and print them onto foundation paper.
Piece the blocks using your scraps, if you are new to foundation paper piecing use our beginner's guide. Cut a fabric strip 4.5 by 8 inches to add to the top from one of your scraps. You could embroider or applique a name onto this piece if you want.
Lay your blocks out with 2 on top of each other, and the fabric strip on top of them, plus one block to the left of the bottom block. Move the blocks around until you find the order you like best. Sew them together, remove the foundation papers and press the seams. If you want to add some body to your stocking you can add fusible fleece or interfacing to the back. I used H360 on mine.

I used a plate to cut the curves for the toe and heel on my stocking, you can do the same or use the curve template I drew from my plate (in the materials list above). Place the stocking front face down on top of the backing fabric (right side up), trace around it and cut it out. Do the same for the 2 lining pieces but fold your lining fabric in half right sides together first.

Place the backing panel on top of the front panel, right sides together. Use pins or sewing clips to hold them together and sew right around the outside but not across the top.
Do the same for the lining fabric but on the long back edge leave a 5 inch gap.

Clip the curves around the heel and toes, where there is a right angle on the top of the foot make a cut inwards which stops just before the stitching. These will all make it easier to turn through and keep it's shape.

Turn the outside of the stocking the right way out, place it inside of the lining with the right sides together. Sew around the top joining the 2 pieces, see below if you want to add a hanging loop.
Hanging loop: If you want to add a hanging loop cut an 8 inch piece of ribbon. Align the raw edges with the top edge of the stocking, on the back seam (the long straight edge). Stitch into place, sew over it 2 or 3 times to reinforce it. Make sure you tuck the ribbon loop down between the right side of the exterior and the right side of the lining fabric before you sew around the top of the stocking.

Pull the stocking through the gap in the lining to turn it the right way around. Sew the lining gap closed, then push the lining into the inside of the stocking. Press the stocking, you can top stitch around the top if desired. Now your stocking is ready to hang up for santa! Why not make one for all the family?
