
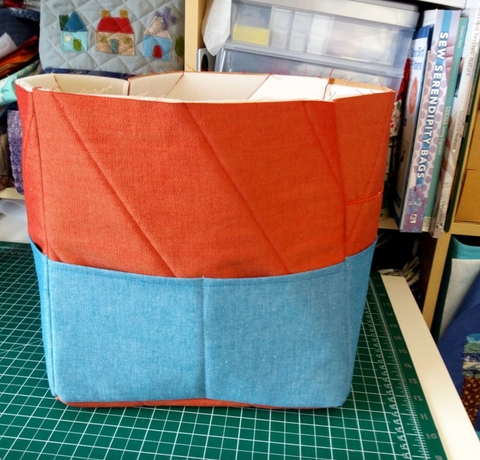
This spacious fabric storage box will hold your sewing tools, fabric and haberdashery plus it also fits our Maker's Workbook into the side too to help you keep track of your projects. I managed to fit over 10 metres of fabric into my Maker's Box. The Vlieseline Style-Vil gives it really good body which means it can hold it's shape even when empty. It has padded handles to make it easy to carry even when full, this fabric storage basket is ideal for sewing room storage or taking sewing projects and supplies out with you.
Materials required
1 metre of exterior fabric. I used the same fabric for the lining and exterior, if you use different ones you will need 1/2 metre of each. I used a vintage red denim material from my stash. Find a similar one here.
1/2 metre of pocket fabric. I used Art Gallery Fabric denim in Endless Paradise (find UK stockists here)
1/2 metre of light or medium weight fusible interfacing. I used Vlieseline H250
1 metre of Vlieseline Style-Vil
1/4 metre of fusible fleece for the handles (or you could use interfacing if you prefer) I used Vlieseline H640
50cm of co-coordinating double fold bias binding
9 inches of elastic

Cutting instructions
Cut 5 x 10.5 inch squares from:
- the exterior fabric
- the lining fabric
- the Style-Vil
Cut 4 x 5.5 by 11 inch rectangles from:
- the pocket fabric
- the fusible interfacing
Cut 2 15 x 5 inch rectangles from the exterior fabric for the handles
Cut 2 14 x 5 inch pieces of fusible fleece or interfacing for the handles
Seam allowance - 1/4 an inch unless otherwise stated. Several stages of this project require sewing within the seam allowance, this means just a little less than quarter an inch so the stitches won't be visible once the Maker's box is assembled.

Exterior Side Panels
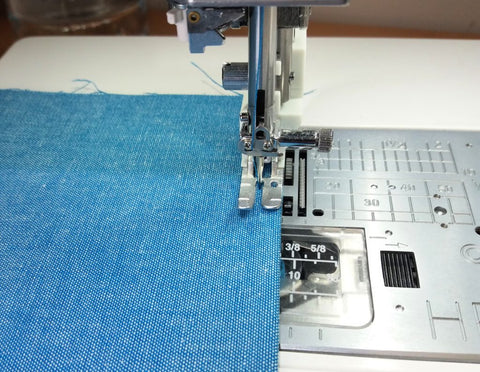
Place the squares of exterior fabric on top of the squares of Style-Vil and either quilt or baste into place. I chose to quilt mine with diagonal lines 3 inches apart. I used a hera marker to mark the quilting lines onto my fabric. If basting just sew around the edges within the 1/4 an inch seam allowance.
Pockets
Fuse the interfacing to the back of your pocket fabrics following the manufacturer's instructions. Fold the pockets in half lengthwise, so the two 10.5 inch edges touch then press. Top stitch along the folded edge.

Place one of the pockets over the bottom of one of the side panels, aligning the edges and bottom (the raw edges of the pocket should line up with the bottom of the side panel). Sew along the edges and bottom within the 1/4 an inch seam allowance to hold the pocket in place. Repeat for the other side panels. One panel will have no pocket, this will be the bottom of your Maker's box.

On one of the side panels add the piece of elastic a few inches above the top of the pocket. Stretch it out to span the side panel, clip the ends into place and then sew over the ends multiple times to make sure they are secure. If you don't have elastic to hand why not use some ribbon instead?

I sewed vertical lines down some of the pockets to split them into smaller pockets, I used my hera marker to mark the lines. For the side with the elastic I split mine into 4 pockets and also sewed the elastic in the same places as shown above. Make sure you leave 1 pocket full size if you want to be able to fit your Maker's Workbook, sewing patterns or other notebook into it.

Forming the box
Place one side panel face up, put another side panel right side down on top of it (make sure they are all the same way up, with the bottom of the pockets at the bottom). Sew along one side edge to join the panels, but stop 1/4 an inch before the bottom.
Add another 2 panels using the same method, and then join the last panel to the first making a square.

Turn the square upside down (so the bottom of the pockets are facing upwards) and place the final exterior panel on top. The 1/4 an inch gap you left when sewing the sides together should allow you to fit the base on more easily. Use Wonder Clips or similar to hold it in place and then sew one side at a time. Stop and cut the thread at the end of sewing each side and reposition the Maker's box under your needle before sewing the next side. Don't try to sew around the whole base in one go.
Turn your fabric box the right sides out and use your fingers to push right around the base and make sure there are no holes. If you find any turn it inside out again and sew them up.
Lining
If you wish to add pockets to the lining of your fabric storage cube repeat the steps above for making pockets using any left over fabric you have.
Then sew the base together as you did the exterior. You do not need to leave a gap in the lining for turning, we will be binding the top instead. Leave the lining with the wrong sides of the fabric facing out.

Binding
Place the lining into the exterior box, with the wrong sides of the fabric touching. Use Wonderclips around the top edge to hold the 2 layers together.
Sew around the top within the seam allowance.

To add the binding open one side of the binding up, align the raw edge with the top edge of the box (on the outside of the box) and pin/Wonderclip into place. Sew along the crease all the way around.

Fold the binding over the raw edge at the top of the box, clip into place and then from the front, using a coordinating thread stitch approximately 1/8th of an inch from the bottom of the binding. This should catch the other side of the binding on the interior of the box, but give you a nice neat line of stitching on the exterior. If you could prefer you could hand sew the binding on the interior.

Making the handles
Fuse the fusible fleece or interfacing to each of the handles, positioning it in the centre so there's a 1/2 inch gap at either end.
Fold in both ends by 1/2 an inch and press. Then fold the whole handle piece in half lengthways with the wrong sides of the fabric touching and press. Open it up and fold the raw edges to the crease you now have down the middle and press.

Fold it back in half again, so all raw edges are hidden in the inside. Use Wonderclips to hold it in place. Top stitch right around the outside in a co-coordinating thread.
On 2 opposite sides of your Maker's box make a chalk mark 2 inches in from the edge and 1.5 inches down from the top on both the left and right. These marks are where you will position the bottom outside corners of your handles.

Put one end of 1 handle in place, hold it with pins or Wonderclips and sew it to the box. I sew each line 3 times, forward, back and then forward again, just to reinforce it so I can carry lots of weight (ie. fabric!) in the box. Repeat for the other end of the strap, then do the same on the opposite side of the Maker's Box.
Now your Maker's Box is finished and ready to fill with supplies!

