
Spoolpod Case Tutorial
This quick to make pouch is big enough to hold 4 SpoolPods at a time, and because it’s clear you can easily spot the spools inside. You can even fit your Maker’s Workbook or Garment Planning Notepad in it too. Don’t be daunted by sewing vinyl, it’s not as scary as you think, I’ve included some tips below.
Materials:
1 fat quarter of fabric
1 fat quarter of medium iron on interfacing
1 fat quarter of vinyl (I used Premium Clear Vinyl from Search Press)
14 inch chunky zip (or longer cut to size which is what I did). You could also use a normal zip but because this is quite a large pouch I think a chunky zip looks better.

Cutting Instructions
Fabric: Cut 2 pieces 15 inches wide by 7 inches high
Interfacing: Cut 2 pieces 15 inches wide by 7 inches high
Vinyl: Cut 2 pieces 14.5 inches wide by 6.5 inches high
Tip – I’ve found cutting vinyl bluntens my rotary cutter so I use an old one for vinyl only, or you can use paper scissors.
Seam allowance: ¼ an inch

Step 1
Iron the interfacing to the back of your two fabric pieces, allow it to cool down. Then fold each square in half lengthways with the right sides of the fabric together. Pin or Wonderclip the edges, sew around the 3 open edges leaving a 3 inch gap for turning through.

Trim the corners to reduce bulk then turn the fabric through the hole you left.

Press it and then top stitch around the edge, about 1/8 of an inch from the edge, making sure to close the gap as you sew.

Step 2
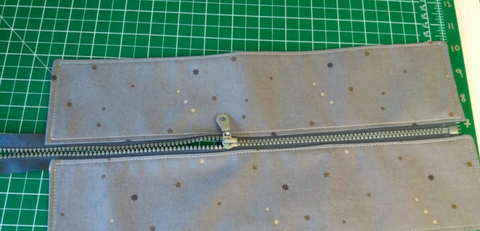
Place one of your fabric rectangles on top of one side of the zip, leaving a little of the zipper tape visible. Leave a ½ inch gap between the zipper end and the edge of the fabric so you won’t catch it in the seam allowance in later stages. As you’ll see from my photos I used a longer zip, and then cut it to size once it was attached.

Pin the zip into place and then sew along your top stitching line near the zip teeth to secure. Repeat with the other fabric rectangle, attaching it to the other side of your zip.

Step 3
Place one of the pieces of vinyl under the bottom of one of the fabric panels so that the top edge of the vinyl is just above the top stitching. Don’t pin the vinyl, pins leave marks, use a Wonderclip each end to hold it into place. Or you could use masking tape or washi tape on the inside to hold it onto place.
Sew the vinyl into place by re-sewing your top stitching line. I used a non-stick/ultra-glide foot on my machine which helps the vinyl feed through more easily however you can use your normal foot. I only just got an ultra glide foot, I've sewn several vinyl projects before this with my regular presser feet. Vinyl can be a little ‘sticky’ in that it sticks to your presser foot or needle plate preventing it from feeding through. If this happens you can try:
- Using a non-stick foot or walking foot
- Cover your foot (and needle plate if needed) with masking tape/washi tape/sellotape as they break the friction between the foot and vinyl.
- Use a sheet of tissue paper between the vinyl and needle plate. Tear off after sewing.
- You might want to use a larger stitch if your vinyl is feeding through slowly

Repeat this to attach the other piece of vinyl to the other side of your pouch.

Step 4
Open the zip almost fully. Fold the pouch at the zip, so the rights sides of the fabric are touching, with the underneath of the zip and the raw edges of the vinyl showing on the outside as per the image above.

Use Wonder clips to hold the 2 sides of the pouch together. Sew around the 3 open edges. I used a zipper foot when sewing the fabric parts because I was starting very close to the zipper teeth. Then switched to my non-stick foot for sewing the vinyl. Don't forget to do a few stitches on the spot to lock your stitches before you cut the thread and swap presser feet.

Step 5
Using a ruler cut a 1/5 inch square from both of the bottom corners.

Pull the 2 inside corners of the square shape in the bottom corners out so the side seam and bottom seam meet in the middle. This boxes your corners, making the pouch much wider. Clip into place and sew. Repeat on the other corner.

Step 6
Turn the pouch through the open zip at the top, so the raw edges of the vinyl and the zip are on the inside. Try not to crease the vinyl too much when turning. If it does crease, once turned through use a hairdryer to soften the vinyl and the creases will drop out.
Your pouch is now finished. Fill it up with Spoolpods and you are good to go!

As you can see from the pictures below I easily fitted 3 x Spoolpods into the case, and there's space for a 4th. The Maker's Workbook or Garment Planning Notepad also fit in.

